• About
  • Contact me!

Salesforce Everywhere

~ Blog on Salesforce Dev and admin stuff

Salesforce Everywhere

Category Archives: Salesforce Configuration

Email-to-Case Issue

26 Thursday Mar 2015

Posted by Mani in Email-to-Case, Point and Click, Salesforce Configuration

≈ Leave a comment

Tags

Email-to-Case Issue, Email-to-Case not creating Cases

In this post, I will discuss about one of the issue which we faced in Email-to-Case(On Demand).

Issue:

On Demand Email-to-Case was configured correctly, but the Case was not getting created in Salesforce.

Analysis:

1. Checked Email-to-Case Routing address configuration and it looked fine.
2. Tried sending an email to the configured routing email address(Salesforce generated email address) and the case was not getting created in Salesforce.
3. Tried increasing Debug logs but Salesforce didn’t log anything.

Solution:

We made few custom fields required at Cases(Required at field level) and this is the reason why Case was not getting created since we didn’t supply values for them. Made required at Page Layout instead of Field level so that the custom fields became mandatory only for the Cases created through UI.

Comments are welcome, as usual.

Block lead conversion unless Lead Status is Qualified

16 Monday Mar 2015

Posted by Mani in Point and Click, Salesforce Configuration

≈ 2 Comments

Tags

Lead Conversion validation, Restrict Lead Conversion

Requirement:

If Lead status is other than Qualified, don’t show Convert Button in Lead Page.

Solution:

Again, we want to achieve this functionality only through Configuration(Point and Click) and not through Visualforce/APEX.

Steps are as follows:

1. Create 2 Record types as “Non Qualified Lead” and “Qualified Lead” for a Lead object under Customize -> Leads -> Record Types. Screenshot is given as below.

Lead Record Type

2. “Non Qualified Lead” will be set as default for all the profiles under Manage users->Profiles as per the below screenshot and “Qualified Lead” will not visible to any profile.

Default Record type

3. Create 2 different Page Layouts, one with Convert button displayed and other one without Convert button.

4. Create two workflows as given below.

The first workflow updates the Lead record type from “Non Qualified Lead” to “Qualified Lead” when a lead status gets changed to Qualified.
Firstwf

Firstwfaction

The other workflow does vice versa.i.e. Change the Lead Record type to “Non Qualified Lead” when a Lead Status is not equal to Qualified.
Secondwf

Secondwfaction

If we had a requirement to restrict Lead Conversion(though show the Convert button in Lead Page) process by showing an error message when user clicks on Convert in Lead Conversion Page, we would have written the following Validation rule under Lead Object as given below:

AND( IsConverted, NOT( TEXT( PRIORVALUE(Status) ) = “Qualified”) )

IsConverted field returns true for a Converted Lead else return false.
PRIORVALUE returns the previous value of the field.

This Validation rule will throw an error as given in Error Message field, if the previous value of the field Status not equal to Qualified and IsConverted=True.

Validation Rule

Please share your comments/suggestions on this.

Sending Contract expiry notice 1 month before the contract expiry date

08 Sunday Mar 2015

Posted by Mani in Salesforce Configuration

≈ 2 Comments

Tags

Contract Expiry Notice

In this post, I will discuss about sending an email to Opportunity owner for Contract expiration.Contracts are maintained outside Salesforce(for instance, in Box).

Requirement:

System should send an email to Opportunity Owner, one month before the contract gets expired and Contract Expiry Date will be calculated based on Contract Term and Close Date selected at Opportunity. For example, if the contract term is 1 year and Close date is March 8th 2015, Contract Expiry Date should be calculated as Feb 8th 2016, system should send an email to the Opportunity Owner on Feb 8th 2016.

Solution:

This can be achieved through Time Dependent Workflow and creating a formula field which calculates Contract Expiry Date. Steps are as follows:

a. Create a field called Contract Expiry Date in Opportunity which should be a formula field and it calculates the date based on Contract Term and Closed date. This should give the day which is Close Date + 11 Months, if the Contract term is 1 year and Close date + 23 months, if the contract term is 2 years and so on. Find the screenshot below for the same:

Contract expiry date

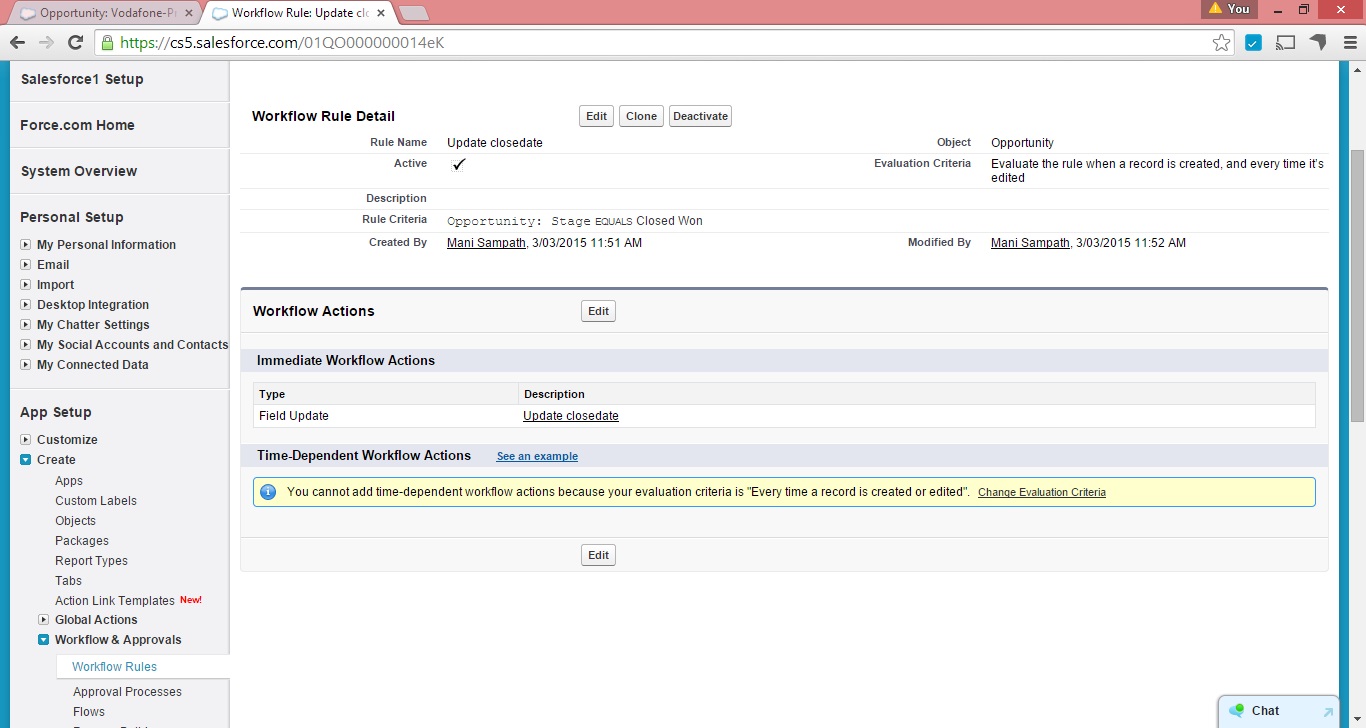
b. Update Close Date to the date when the Opportunity is set to Closed Won. This is done through the workflow and it will fire when a record is created, and every time it’s edited. Create the workflow rule and action as given below. This is done so that Close Date is set automatically even when user forgets to update the Close Date after setting the Stage to Closed Won:

Wftoupdateclosedate

workflow action

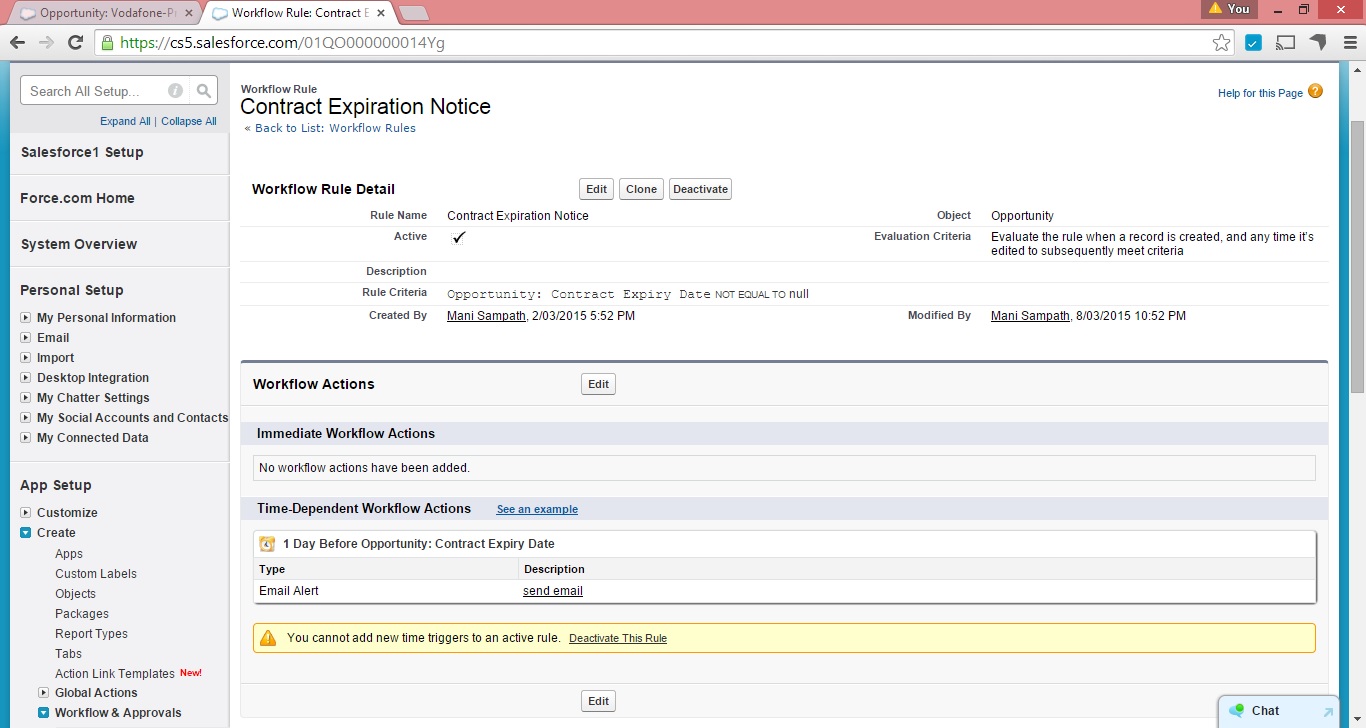
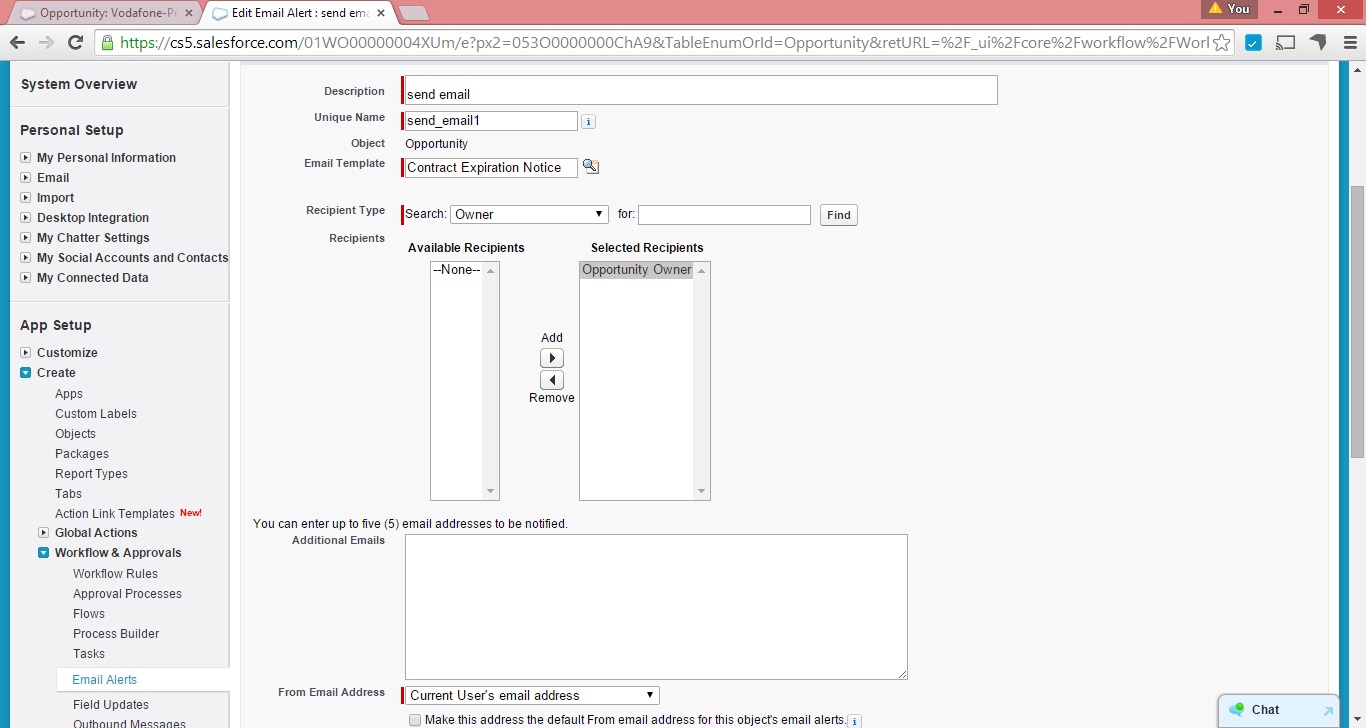
c. Create a workflow and a Time dependent workflow action to send an email 1 day before Contract Expiry Date as per the screenshot below. This should fire only when Contract Expiry Date is not null and evaluation criteria as Evaluate the rule when a record is created, and any time it’s edited to subsequently meet criteria.

Timedependent wf

Timedependentaction

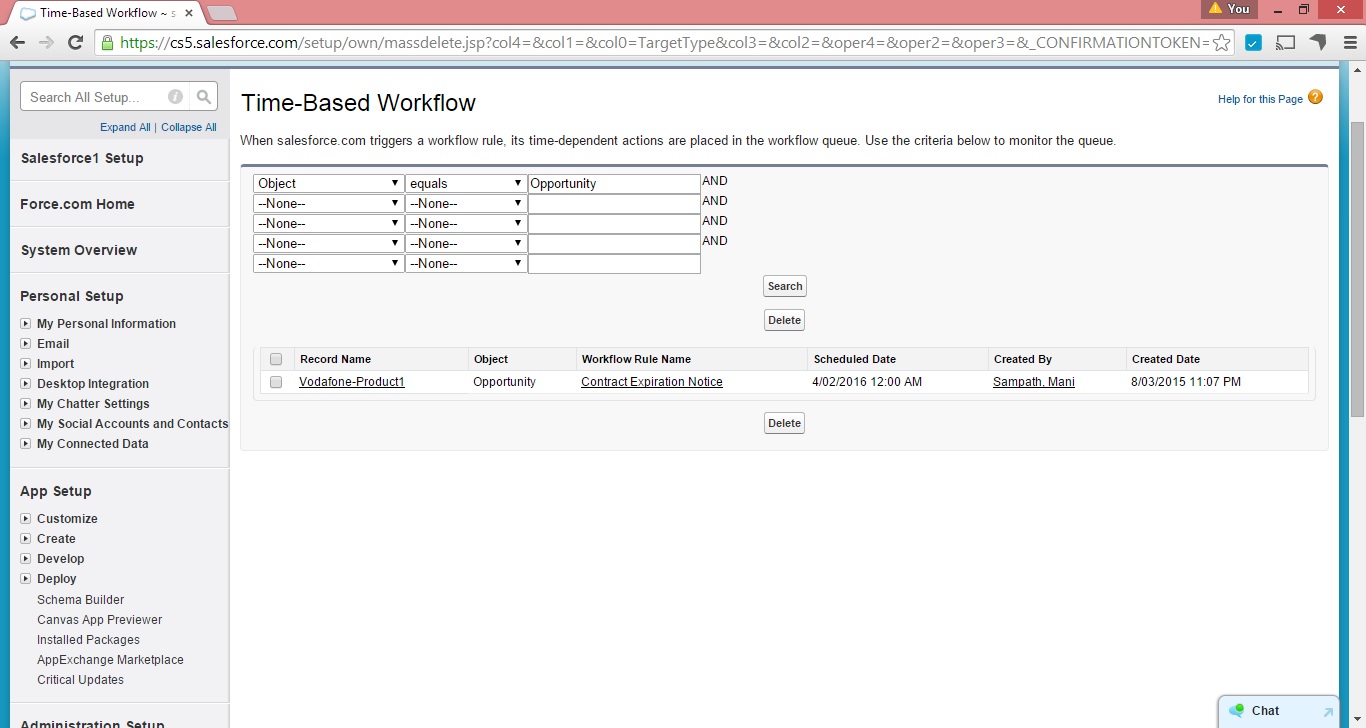
You can goto Monitoring to see if Time dependent actions are queued for the Opportunity record:

Opportunity record

Timedependentmonitoring

The solution I proposed above will calculate the Contract Expiry Date as 5th Feb 2016 instead of 8th Feb 2016, if the Close Date is 8th March 2015 and Contract term is 1 year. This is because of the formula which I used to calculate the Contract Expiry Date as not all months have equal no of days and the formula gives the approximate day of 1 month before (Close Date + Contract Term). I will discuss in next post to calculate the exact Contract Expiry Date.

Please share your thoughts/comments.

Populate Opportunity Record type with Lead Record Type

28 Saturday Feb 2015

Posted by Mani in Salesforce Configuration

≈ Leave a comment

Tags

Salesforce Record Types

Welcome to my first post!

In this post, I will explain how we can populate Opportunity record type with Lead record type by using Configuration.

Record types allow us to offer different business processes, picklist values, and page layouts to different users.

Requirement:

Lead has record types (lets say Sales and Support) and the same record type is there for Opportunity too. When a lead is converted to Opportunity, based on the lead record type, Opportunity record type need to be set. For example, when a Sales lead is converted, it should create only Sales Opportunity.

Solution:

No trigger/apex code is required and the desired functionality can be achieved through configuration.

Steps are as follows:

a. Create a Formula field (say rectype) in Lead object with the value as RecordType.Name and set the return type of the field as Text. This will store the record type of the lead.
b. Create a text field (say Lead rectype) in Opportunity object to store Lead Record type.
c. Click on Map Lead fields under Lead Object->Fields. Map the field created in step a to the Opportunity field created in step b.
d. Create a workflow rule under Setup->Create -> Workflow & Approvals to set Opportunity record type(for example to Sales).
1. Evaluation criteria – Set it to “Evaluate the rule when a record is created”. we want the rule to fire every time when a record is created.
2. Set the rule criteria as Opportunity: Lead rectype equals Sales.
3. Add Workflow action as New Field Update. Field to Update as Opportunity: Opportunity Record Type and specify new field value as Sales.
4. Remember to activate the workflow as its not active by default. This can be done by going to Setup->Create->Workflow & Approvals-> click on Activate for the workflow created in step d.

Please share your comments/suggestions.

Newer posts →

Blog Stats

  • 145,223 hits

Archives

Recent Posts: Salesforce Everywhere

Einstein GPT

How to get field values on onLoad in lightning-record-edit-form in LWC?

Using Dynamic Actions

How to check if the logged in user is a Guest user or not in APEX class?

How to Close Quick action in LWC

Connect with me

  • View @manibalan_s’s profile on Twitter
  • LinkedIn

Enter your email address and click on Follow us (below) to follow this blog and receive notifications of new posts by email.

Website Powered by WordPress.com.

Privacy & Cookies: This site uses cookies. By continuing to use this website, you agree to their use.
To find out more, including how to control cookies, see here: Cookie Policy
  • Subscribe Subscribed
    • Salesforce Everywhere
    • Already have a WordPress.com account? Log in now.
    • Salesforce Everywhere
    • Subscribe Subscribed
    • Sign up
    • Log in
    • Report this content
    • View site in Reader
    • Manage subscriptions
    • Collapse this bar