Tags
I know it is a long time, but very happy to share that I have written a blog on Einstein GPT in my company website. It is published at the link below and enjoy reading it,Thanks!

06 Saturday May 2023
Posted in AI, Uncategorized
Tags
I know it is a long time, but very happy to share that I have written a blog on Einstein GPT in my company website. It is published at the link below and enjoy reading it,Thanks!
03 Monday Jan 2022
Posted in Uncategorized
Let’s say we are using lightning-record-edit form in LWC to display/edit the data and we have a requirement to get the field values during the onLoad event of the form.
For instance, onLoad event calls handleOnLoad method and the code below shows the right approach to get the field values from the form based on the recordId:
handleOnLoad(event) {
        var record = event.detail.records;
        var fields = record[this.recordId].fields;(obviously we need to have the recordId declared as @api decorator and the lwc is placed on the record page. Please refer the link https://developer.salesforce.com/docs/component-library/documentation/en/lwc/lwc.use_record_context to read more about it)
        const assetName = fields.Name.value;
        alert(assetName);
}

We can use template.querySelector as well(as given below), but it is not the right approach(rather not a good approach):

handleOnLoad() {
    let name = this.template.querySelector('.name').value;//in the html, we should have given class="name" for the name field
}
Hope this post is helpful and let me know for any questions. Thanks!!
11 Wednesday Aug 2021
Posted in Salesforce Configuration
Scenario:
Let’s say we have a quick action button(Edit) in the Highlights panel and the object behind the page is a Custom object. Also, we have a field called Form Status and we need to hide the button, when the Form Status = Pending Department Approval or Form Status = Pending Final Approval. This means, when the record is pending for approval, we don’t want any user to edit it.
Solution:
Use Dynamic actions :). This feature lets us to show or hide the actions based on criteria(s).
Dynamic actions for custom objects are now GA for mobile, and have been GA for desktop since Winter ‘21. Dynamic actions for Account, Case, Contact, Lead, and Opportunity are now GA for desktop. Dynamic actions for all other standard objects are Beta for desktop.
Where: This change applies to Lightning Experience desktop and the Salesforce mobile app in Group, Essentials, Professional, Enterprise, Performance, Unlimited, and Developer editions.
How: To enable dynamic actions for a custom object on desktop and mobile, add or select the Highlights Panel component on the object’s record page. In the Highlights Panel properties pane, click Upgrade Now and step through the migration assistant to migrate actions or start with new ones.
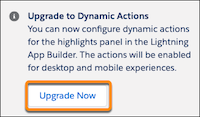
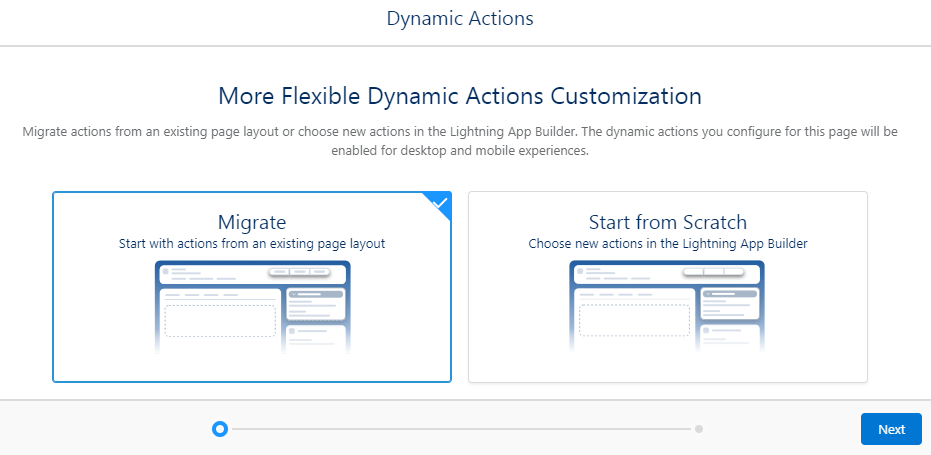
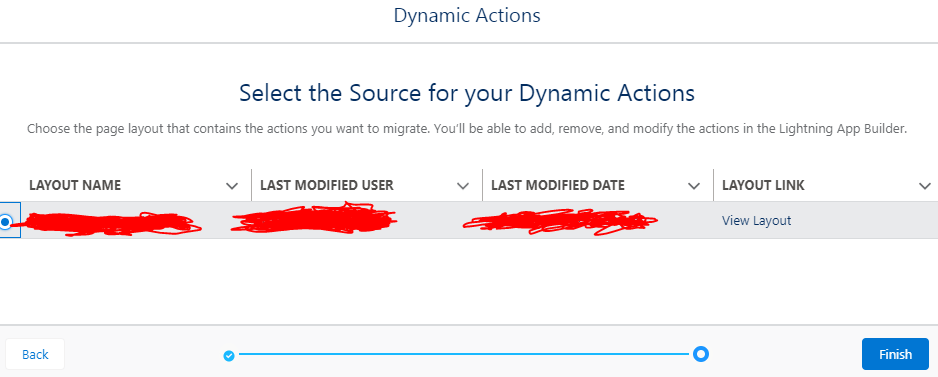
When you click on Upgrade now, system will ask you to migrate the existing page or start from Scratch. I had selected the Migrate option and chosen the page layout that is displayed on the record page. That’s it, now you can use Dynamic actions!!
Select the action(in this case, it is Edit) and click on Add Filter for that action. You can have multiple filters and set the filter logic as well:

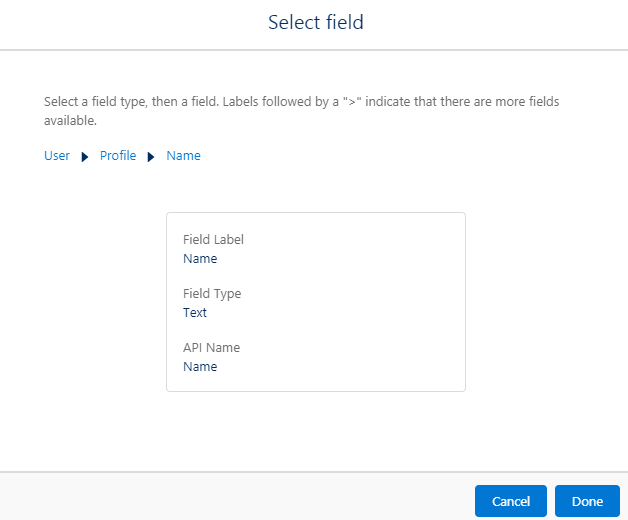
The beauty of this feature is that we can also make this button available only for System administrators by checking the logged in user profile, when the Form Status = Pending Department Approval or Form Status = Pending Final Approval:


Hope this post is helpful and please leave your comments below for any questions. Thanks!!
P.S: To stay up to date on the road map for Dynamic Actions please join the Trailblazer Group here.
08 Sunday Aug 2021
Posted in Uncategorized
Tags
To check if the logged in user is a Guest user or not in the APEX code, we can make use of the method isGuestUser() in Auth.CommunitiesUtil class where Auth is the namespace that provides an interface and classes for single sign-on into Salesforce and session security management.
        if(Auth.CommunitiesUtil.isGuestUser())
        {
            <call method X>
        }
        else
        {
            <call method Y>
        }
Also, there is a method isInternalUser() which returns true if the logged in user is an employee or the Internal user.
Hope this post is helpful!!
07 Saturday Aug 2021
Posted in Uncategorized
Recently, as part of Summer 21 release, Salesforce has given us an option to call the LWC directly from the Quick Action, earlier we had to call Lightning Component(LC) from the Quick Action and call the LWC from LC.
In my current project, I had created a Quick Action called “Edit” and to close the Quick Action when user clicks on Cancel button inside the modal, we had to do the following:
import { CloseActionScreenEvent } from ‘lightning/actions’;
Let’s say the method closeModal is called, when user clicks on Cancel button:
closeModal() {
this.dispatchEvent(new CloseActionScreenEvent());
}
To create the modal when user clicks on Edit button, we have not used lightning-quick-action-panel component(Beta) and used Modals blueprint in SLDS. Please refer the above link for creating a Quick Action and calling the LWC from it:
https://developer.salesforce.com/blogs/2021/05/learn-moar-with-summer-21-lwc-quick-actions
Documentation for the lightning-quick-action-panel is available in the below link:
Thanks and see you all at the next post!!
P.S: Tried Anchor PodCast tool for this blog post:) and here is the link https://anchor.fm/manibalan-sampathkumar/episodes/How-to-Close-Quick-action-in-LWC-e15j8ta
13 Monday Apr 2020
Posted in Lightning Component
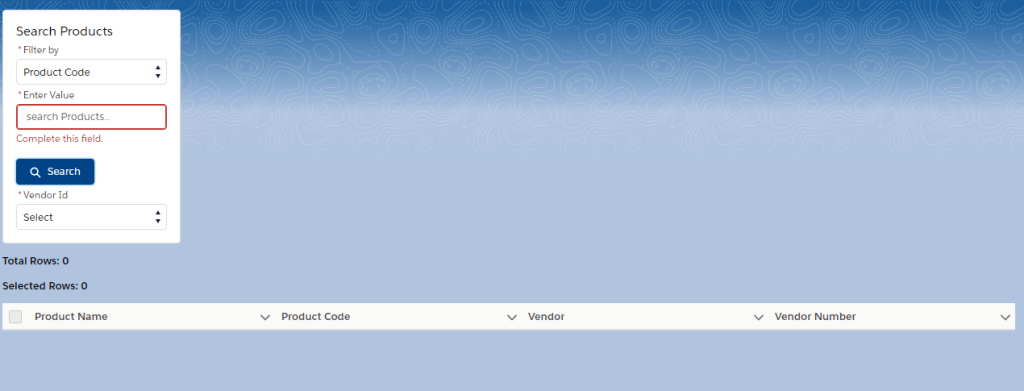
In this blog post, we will discuss on creating a lightning component to filter products based on Product Code and Product Name. User can type multiple codes or names separated by comma. Then, we will display the results based on the given search criteria using lightning data table.
We have accounts of type=Vendor and every product is linked to a Vendor account. We will have a Vendor picklist in the component and it gets populated with the distinct values from the Vendor Number column on the search results.
Apex Class:
public with sharing class SearchProductController {

 @AuraEnabled public List<String> result{get;set;}
 @AuraEnabled public List < Product2 > returnList{get;set;}

 @AuraEnabled
 public static SearchProductController fetchProductbyName(String searchKeyWord) {

     SearchProductController obj = new SearchProductController();
     String searchKey;
     Set < String > returnSetVIds = new Set < String > ();
     List < String > returnListVIds = new List < String > ();
     try
     {
     if(searchKeyWord.contains(','))
     {
         List<String> searchKeyCode = searchKeyWord.split(',') ;
         obj.returnList = [select Name,ProductCode,Voltumcon1__Vendor_Name__c, Voltumcon1__Vendor_Number__c
                          from Product2
                          where Name in: searchKeyCode AND IsActive=TRUE LIMIT 500
                           ];
     }
     else
     {

     searchKey = searchKeyWord + '%';
     obj.returnList  = [select Name,ProductCode,Voltumcon1__Vendor_Name__c,Voltumcon1__Vendor_Number__c from Product2
                                   where Name LIKE: searchKey AND IsActive=TRUE LIMIT 500];
      }
 for (Product2 prd: obj.returnList) {
   //obj.returnList.add(prd);
   returnListVIds.add(prd.Voltumcon1__Vendor_Number__c);
  }
  system.debug(returnListVIds);
  returnSetVIds.addAll(returnListVIds);
  system.debug(returnSetVIds);
  obj.result = new List<String>();
  obj.result.addAll(returnSetVIds);
  return obj;
  }
     catch (Exception e) {
        // "Convert" the exception into an AuraHandledException
        throw new AuraHandledException('Something went wrong: '
            + e.getMessage());
    }
 }

 @AuraEnabled
 public static SearchProductController fetchProductbyCode(String searchKeyWord) {

     SearchProductController objCode = new SearchProductController();
     List<String> searchKeyCode;
     Set < String > returnSetVIds = new Set < String > ();
     List < String > returnListVIds = new List < String > ();
     String searchKey;
     try
     {
     if(searchKeyWord.contains(','))
     {
       searchKeyCode = searchKeyWord.split(',') ;
       objCode.returnList = [select Name,ProductCode,Voltumcon1__Vendor_Name__c,Voltumcon1__Vendor_Number__c
                          from Product2
                          where ProductCode in: searchKeyCode AND IsActive=TRUE LIMIT 500
                           ];
     }

     else
     {
      searchKey = searchKeyWord + '%';
      objCode.returnList = [select Name,ProductCode,Voltumcon1__Vendor_Name__c,Voltumcon1__Vendor_Number__c
                           from Product2
                           where ProductCode LIKE: searchKey AND IsActive=TRUE LIMIT 500
                           ];
     }

     for (Product2 prd: objCode.returnList) {
         returnListVIds.add(prd.Voltumcon1__Vendor_Number__c);
  }

  returnSetVIds.addAll(returnListVIds);
   objCode.result = new List<String>();
  objCode.result.addAll(returnSetVIds);
  return objCode;
    }

      catch (Exception e) {
        // "Convert" the exception into an AuraHandledException
        throw new AuraHandledException('Something went wrong: '
            + e.getMessage());
    }
 }

}
Please note that we have created 2 lists in the above class, one to hold the search results and the other one for holding Vendor Numbers.
Lightning Component:
<aura:component implements="force:appHostable,flexipage:availableForAllPageTypes,flexipage:availableForRecordHome,force:hasRecordId" access="global" controller="SearchProductController" >

    <aura:attribute name="searchKeyword" type="String" description="search input"/>
    <aura:attribute name="TotalNumberOfRecords" type="integer" default="0" description="display Total Number of records"/>
    <aura:attribute name="selectedRowsCount" type="Integer" default="0"/>
    <aura:attribute name="mycolumns" type="List"/>
    <aura:attribute name="isLoading" type="Boolean" default="false"/>
    <aura:attribute name="objClassController" type="SearchProductController"/>

    <aura:handler name="init" value="{! this }" action="{! c.init }"/>

     <!-- SHOW LOADING SPINNER-->
    <lightning:spinner variant="brand" size="large" aura:id="Id_spinner" class="slds-hide" />

        <div aria-labelledby="newSearchForm" class="slds-grid">
        <!-- BOXED AREA -->
        <fieldset class="slds-box slds-theme--default slds-container--small">

        <label id="newSearchForm" class="slds-text-heading--small
        slds-p-vertical--medium">
        Search Products
        </label>

            <form class="slds-form--stacked">

                <lightning:select aura:id="selectfilter" name="select1" label="Filter by" onchange="{! c.onChange }" required="true" >
				<option value="Product Code">Product Code</option>
				<option value="Product Name">Product Name</option>
			</lightning:select>

               <lightning:input value="{!v.searchKeyword}"
                                 required="true"
                                 placeholder="search Products.."
                                 aura:id="searchField"
                                 label="Enter Value"/>


                 <lightning:button onclick="{!c.Search}"
                                   class="slds-m-top--medium"
                                  variant="brand"
                                  label="Search"
                                  iconName="utility:search"/>

                <br></br>
                <div class="slds-form-element__control slds-grow" >
           		<lightning:select name="VendorId" label="Vendor Id" required="true" aura:id="VendorId"
                                  messageWhenValueMissing="Select a valid value">
               	<option value="">Select</option>
         			<aura:iteration items="{!v.objClassController.result}" var="item">
            		<option value="{!item}" text="{!item}"></option>
        			</aura:iteration>
    				</lightning:select>
            </div>

            </form>
            </fieldset>
    	 </div>

       <div class="slds-m-vertical_small">
           <aura:if isTrue="{!v.objClassController.returnList.length >0}">
           <h1 class="slds-m-vertical_small"><b>Total Rows: {! v.objClassController.returnList.length }</b></h1>

           <aura:set attribute="else">
               <h1 class="slds-m-vertical_small"><b>Total Rows: 0</b></h1>
           </aura:set>
           </aura:if>
               <h1 class="slds-m-vertical_small"><b>Selected Rows: {! v.selectedRowsCount }</b></h1>


    <lightning:datatable data="{! v.objClassController.returnList }"
        columns="{! v.mycolumns }"
        aura:id="avreltable"
        onrowselection="{!c.updateSelectedText}"
        onsort="{! c.updateColumnSorting }"
        keyField="Id"/>

    </div>

</aura:component>
Points to note in the above component:
a. We are using lightning:datatable to display search results. Data table is a table that displays columns of data, formatted according to type. This is one of the base component provided by the Lightning framework. Please refer this link for more details https://developer.salesforce.com/docs/component-library/bundle/lightning:datatable/example
b. We have created an attribute “objClassController” of apex class type to fetch the lists from the class to display the search results and Vendor numbers.
JS Controller:
({
   init: function (cmp, event, helper) {
        cmp.set('v.mycolumns', [

            { label: 'Product Name', fieldName: 'Name', sortable: true,type: 'text'},
            { label: 'Product Code', fieldName: 'ProductCode', sortable: true,type: 'text'},
            { label: 'Vendor', fieldName: 'Voltumcon1__Vendor_Name__c',sortable: true,type: 'text'},
            { label: 'Vendor Number', fieldName: 'Voltumcon1__Vendor_Number__c',sortable: true,type: 'text'}
        ]);

    },

    updateSelectedText: function (cmp, event) {
        var selectedRows = event.getParam('selectedRows');
        cmp.set('v.selectedRowsCount', selectedRows.length);
        },

    Search: function(component, event, helper) {
        var searchField = component.find('searchField');
        var isValueMissing = searchField.get('v.validity').valueMissing;
        // if value is missing show error message and focus on field
        if(isValueMissing) {
            searchField.showHelpMessageIfInvalid();

        }else{
          // else call helper function
            helper.SearchHelper(component, event);

        }
    },

    onChange: function (cmp, evt, helper) {

    cmp.set('v.searchKeyword',null);
    },

    updateColumnSorting: function (cmp, event, helper) {
        cmp.set('v.isLoading', true);
        // We use the setTimeout method here to simulate the async
        // process of the sorting data, so that user will see the
        // spinner loading when the data is being sorted.
        setTimeout(function() {
            var fieldName = event.getParam('fieldName');
            var sortDirection = event.getParam('sortDirection');
            cmp.set("v.sortedBy", fieldName);
            cmp.set("v.sortedDirection", sortDirection);
            helper.sortData(cmp, fieldName, sortDirection);
            cmp.set('v.isLoading', false);
        }, 0);
    }

})
Helper function:
({
    SearchHelper: function(component, event) {
        // show spinner message
         component.find("Id_spinner").set("v.class" , 'slds-show');

        var filter = component.find("selectfilter").get('v.value');

        	if(filter == "Product Code")
            {
              var action = component.get("c.fetchProductbyCode");
            }
         	else if(filter == "Product Name")
         	{
          	var action = component.get("c.fetchProductbyName");
         	}
        	action.setParams({
            'searchKeyWord': component.get("v.searchKeyword")
        });
        action.setCallback(this, function(response) {
           // hide spinner when response coming from server
            component.find("Id_spinner").set("v.class" , 'slds-hide');
            var state = response.getState();
            if (state === "SUCCESS") {
                var storeResponse = response.getReturnValue();
                component.set('v.objClassController', storeResponse);

            }else if (state === "INCOMPLETE") {
                alert('Response is Incompleted');
            }else if (state === "ERROR") {
                var errors = response.getError();
                if (errors) {
                    if (errors[0] && errors[0].message) {
                        alert("Error message: " +
                                    errors[0].message);
                    }
                } else {
                    alert("Unknown error");
                }
            }
        });
        $A.enqueueAction(action);
    },

    sortData: function (cmp, fieldName, sortDirection) {
        var data = cmp.get("v.objClassController.returnList");
        var reverse = sortDirection !== 'asc';

        data = Object.assign([],
            data.sort(this.sortBy(fieldName, reverse ? -1 : 1))
        );
        cmp.set("v.objClassController.returnList", data);
    },
    sortBy: function (field, reverse, primer) {
        var key = primer
            ? function(x) { return primer(x[field]) }
            : function(x) { return x[field] };

        return function (a, b) {
            var A = key(a);
            var B = key(b);
            return reverse * ((A > B) - (B > A));
        };
    }


})
Output Screenshots:

Clicking on Search button without giving any value throws error:
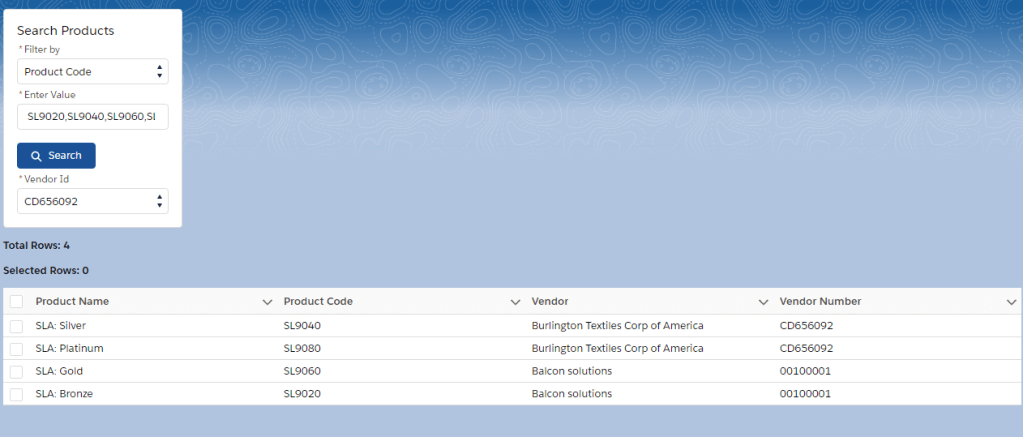
Search on Product codes by entering them with comma separated values. Vendor Id got auto populated with the distinct Vendor Numbers from the search results:

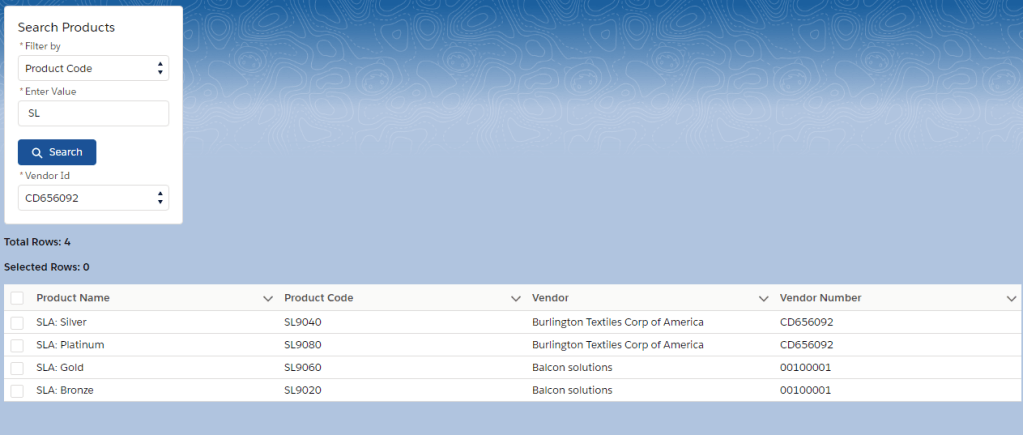
Component will do a wildcard search for the entered value(in this case ‘SL’):
When the rows are selected, Selected rows will show the count of selected rows:

Wildcard search for the Product Name:

Exact search for the Product Name:

Please let me know for any questions. Thanks and stay safe!!
22 Thursday Aug 2019
Posted in Lightning Component
In the previous post, we discussed about the Introduction of Lightning Components and now, we will create a Simple Lightning Component.
Prerequisite:
Before we create a Lightning Component, we need to make sure that My Domain is enabled in our Salesforce Org as it is Required to Use Lightning Components in Lightning component tabs, Lightning pages, the Lightning App Builder, or standalone apps. We will not cover this topic here and you can refer the link https://help.salesforce.com/articleView?id=domain_name_overview.htm&type=5 for more information.
Create a new Lightning Component:
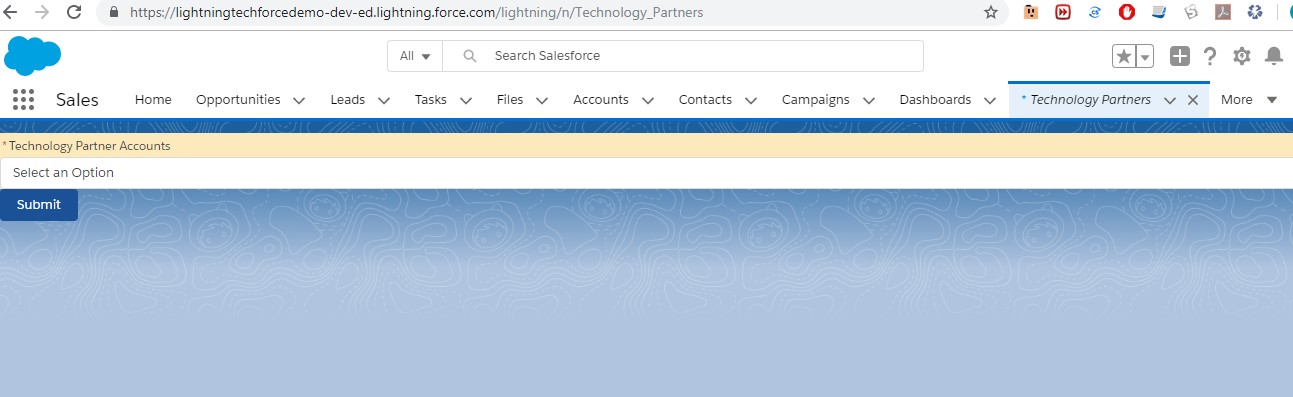
Since we have already enabled MyDomain in our Salesforce Org, let us create a simple Lightning component to show all the Partner Accounts(Type=’Technology Partner’) in the drop down and we will also have a button called “Submit”, upon clicking on it, it will show the selected account. This Lightning Component will be added as a tab in Lightning Experience.
Output:
Tab accessed from All Items

Accounts sorted in asc order based on the account name:

Upon clicking on Submit button:

Steps to create a Lightning Component:
Step 1:
We will have to open Developer console and create a new Lightning Component Bundle

Step 2:
File -> New->Lightning Component
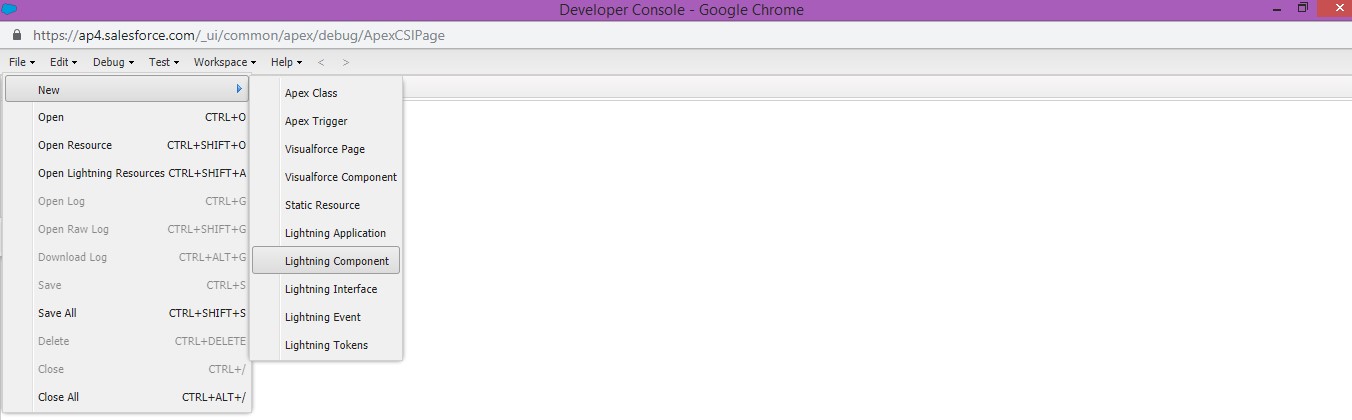

No spaces are allowed in the Name hence I have given ‘PartnerAccountsDisplay’ and given a meaningful description. I have not selected anything in the Component Configuration for now. Then, click on Submit button.
This creates a new ‘PartnerAccountsDisplay’ component bundle, with two open tabs. Close the first tab, and keep the PartnerAccountsDisplay.cmp tab open. We need to write our code in component editor between aura:component tags.

As we mentioned earlier, Lightning Component will have JavaScript(called as Client Side Controller) on the client side to handle validations, events, calling the apex class method and handle the response as well etc and on the server side, it is apex which will query all the Partner accounts in this case and send the output as a list to the Client Side Controller which will then be used to display them as options in the Combo-box(drop down).
Apex class:
global with sharing class ManageAccount {

    @AuraEnabled(cacheable=true)
    public static List<Account> GetAccount( String userId ) {
        String query;
        List<Account> accountList;
        query='SELECT Id,Name from Account WHERE Type=\'Technology Partner\' ORDER BY Name asc';
        accountList = new List<Account>();
        accountList = (List<Account>)Database.query(query);
        return(accountList);
    }

}
To make this method GetAccount available to our Lightning Component code (Client-Side Controller), there are two specific things done as given below:
PartnerAccountsDisplay.cmp
<aura:component access="global" implements="force:appHostable" controller="ManageAccount">
	<aura:attribute name="AccountSelectValue" type="String" default="" />
    <aura:attribute name="SelectOptions" type="List" />
   <aura:handler name="init" value="{!this}" action="{!c.doInit}"/>

                    <lightning:combobox aura:id="select" name="selectcombo" label="Technology Partner Accounts"
                     required="true" value="{!v.AccountSelectValue}" options="{! v.SelectOptions }" style="background-color: #fceabd;"/>
    <lightning:button variant="brand" label="Submit" title="Base action" onclick="{! c.handleClick }"/>

</aura:component>
What we have done in the Component code
P.S:if c. is used in the component, Salesforce will understand that it refers to the corresponding Client side Controller(js) and using c. in the Client Side controller will refer to the Server Side Controller(apex class). Also, note the usage of v. whereas v is something called a value provider. Basically, think of v as an automatic variable that’s made available for us to use to access Component’s attributes.
PartnerAccountsDisplayController.js(Client Side Controller)
({
	doInit : function(component, event, helper) {
		var action = component.get("c.GetAccount");
        //action.setParams({ userId : $A.get("$SObjectType.CurrentUser.Id") });
        action.setCallback(this, function(response){
            var state = response.getState();
            console.log('>>>>> state'+ state );
            if (state === "SUCCESS") {
            	console.log('======');
            	console.log(response.getReturnValue());
                var options = [];
                var allData = response.getReturnValue();
                console.log('resp',allData);
			    for(var x in allData){
			    	options.push({ value: allData[x].Name, label: allData[x].Name});
			    }
			    console.log('options : ',options);
			    component.set("v.SelectOptions", options);
	}
})
        $A.enqueueAction(action);
    },


    handleClick: function (cmp, event) {
        // This will contain the string of the "value" attribute of the selected option
        var selectedOptionValue = cmp.get("v.AccountSelectValue");
        alert("Selected Partner Account is: '" + selectedOptionValue + "'");
    }


});
What we have done in the Client Side Controller code:
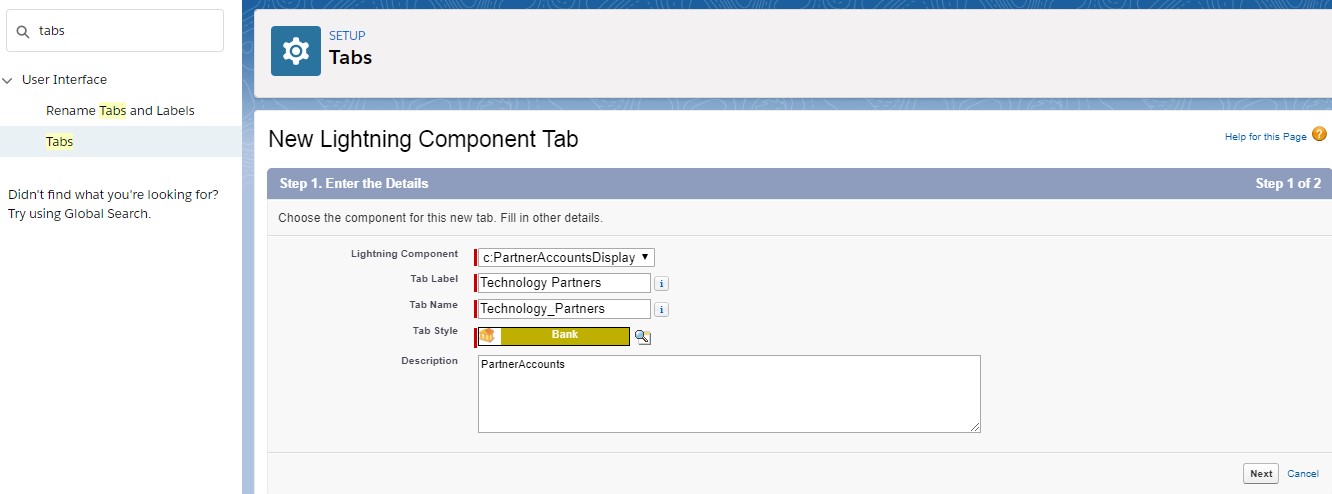
Lightning Tab:
Finally, we created a Lightning tab as per the screenshot below to launch the Component.
We can talk about Lightning Design System and the Component Bundle such as Helper, Style, Documentation, Renderer, Design and SVG in the upcoming blog post.
I have given a very simple example of the Lightning Component as above and I have experience in building Simple, medium and complex Lightning Components including Lightning Communities for various clients. I am happy to help you to develop new Lightning Components and modify the existing Components based on the requirement. Please reach me at balabemdu@gmail.com for more information. Also, you can give your comments below reg any questions on this blog post.
31 Wednesday Jul 2019
Posted in Lightning Component
It has been a long time:) and lot happened in my personal life..Last year, I have been blessed with a baby boy :)…Let’s jump to the topic now..
Before we know about Lightning Component(LC), let’s talk about Lightning Component framework.
As per Salesforce, The Lightning Component framework is a modern UI framework for developing dynamic, responsive web apps for mobile and desktop devices. It uses JavaScript on the client side and Apex on the server side.

Advantages of Lightning Component Framework:
So, what are Lightning Components or Aura Components?
Aura components are the self-contained and reusable units of an app.
A component can contain other components, as well as HTML, CSS, JavaScript, or any other Web-enabled code. This enables us to build apps with sophisticated UIs .
Base Lightning Components
The Lightning framework already has a set of prebuilt components and they are known as Base Lightning Components.
Now we know the definition of LC, there is also Base Lightning Components. What is it used for?
For instance, if we want to create a button, we don’t need to write code from scratch instead we make use of lightning:button base lightning component in our app and here lightning represents the namespace. The best part is we can configure the base component(meaning configure the given attributes etc) to form a new component in our app and it works seamlessly with desktop and mobile devices.
These base components handle the details of HTML and CSS for us too which makes it as light weight components. The whole list of component details are available in this component library link: https://developer.salesforce.com/docs/component-library/overview/components
Where can we use Lightning Components?
To see the lightning components in action in Salesforce, we need to launch it from either tabs or apps or actions:
Add LC as a Custom Tab in a Lightning Experience App
You can add Lightning Components as Custom Tabs by creating a Lightning tab under Setup->User Interface ->Tabs->Click New in the Lightning Component Tabs related list.


Once added as a tab, it will be available in All Items, if it is not added under Apps. If we create a new Lightning App under Setup -> App Manager | New Lightning App, it will be available in the App Launcher.
Note: We need to implement the force:appHostable interface(Out-of-box) in the aura:component tag on the Lightning component to allow it to be used as a custom tab in Lightning Experience or the Salesforce mobile app. I will create a LC in the next post which will be added as a custom tab in Lightning Experience.
Add LC as a Custom Tab in a Salesforce Mobile App
Create a custom Lightning component tab for the component under Setup->Tabs->Click New in the Lightning Tabs related list as described above.
Then, add your Lightning component to the Salesforce app navigation menu under Setup->Navigation->Salesforce Navigation. Once added, it will be displayed as a new menu item in the navigation menu in Salesforce mobile web.
Launch LC as a Quick Action
Create actions using a Lightning component under Setup->Objects->Account(for example)->Buttons and Links->Click on New Action button, and then add the action to an object’s page layout to make it instantly accessible from a record page.

Note: We need to add the force:lightningQuickAction or force:lightningQuickActionWithoutHeader interface(Out-of-box) to an Aura component tag on the LC to enable it to be used as a custom action in Lightning Experience or the Salesforce mobile app.
Add LC to Lightning Pages
A Lightning Page is a custom layout that lets us design pages for use in the Salesforce mobile app or in Lightning Experience. There are three types of Lightning Page and they are App Page, Home Page and Record Page. They can be created under Setup->User Interface -> Lightning App Builder and we can add our Lightning component to the Page.

Override Standard Actions with Aura Components
We can override the View, New, Edit, and Tab standard actions on most standard and all custom objects. One such example for account edit action override is given below:
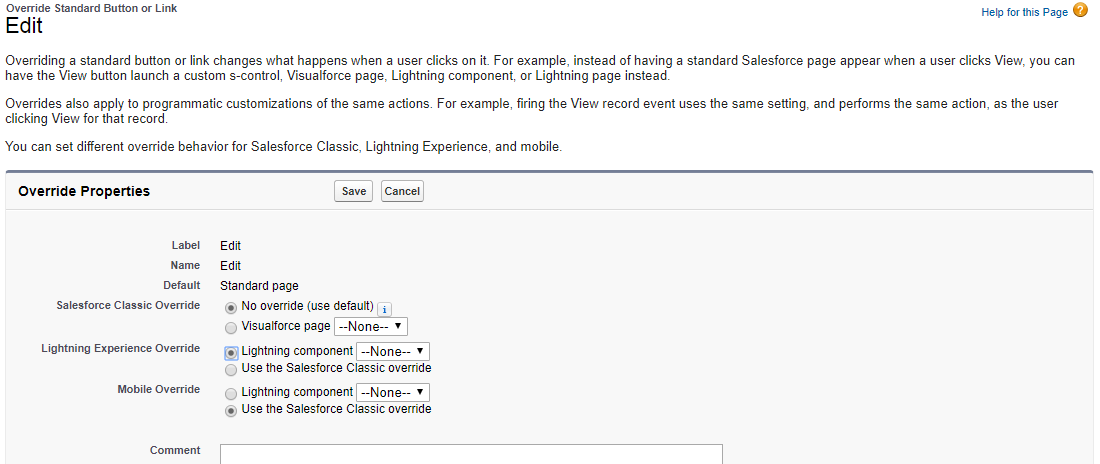
Note: We need to implement the lightning:actionOverride interface(Out-of-box) to an Aura component tag on the LC to enable it to be used as a Override action in Lightning Experience.
Also, Lightning Components can be added to:
In the next post , I will create a simple Lightning Component and demonstrate its capabilities. Until then, see you!!
P.S. If you have any questions about this post, please give your comments below.
15 Tuesday May 2018
Posted in Salesforce Configuration, Uncategorized
Tags
I have faced this issue recently in my current project [Later on, I realized that I was aware of this issue earlier perhaps 3 yrs ago when I was working in the consulting firm, my bad memory:)]. The requirement is to create the calendar event when the record is created in one of our Custom object based on the start and end date fields in it.
I created a process builder and it gets triggered when the new record is created in the Custom object. Immediate action in the process builder is to create a record in Event object.
It works fine when the difference in start and end date is less than or equal to 14 days (duration of the event is less than or equal to 14 days) else it throws an error ”
Vote for the below idea so that salesforce removes this limit in the calendar event:
https://success.salesforce.com/ideaView?id=08730000000Guw6AAC
Workaround: I created a flow to create events based on the start and end date. Suppose, start and end date span for 6 months(Start date=15/5/2018 and End date=15/11/2018), split them into 14 days and create events accordingly. So, in this case, I would have created 13 event records approximately from 15/5/2018.
Please comment below for any questions on this.
29 Sunday Apr 2018
Posted in Salesforce Configuration, Uncategorized
Tags
Recently, when I tried creating a lookup relationship with the Product (Standard Object) from the custom object, I got the below error though I was not trying to create the Master Detail relationship:
You cannot create a new Master-Detail relationship on an existing custom object if records already exist. You must first create a Lookup relationship, populate the lookup field with data in all records, and then change the relationship type to Master-Detail.
Moreover, the custom object was a new object and it did not have any records. I was bit confused and the error message is misleading as well. Then, after googling, it looks like you can create a lookup field to Product only if you allow to clear the field if the Product record is deleted(please check the below screenshot for your reference):

Please let me know for any clarification.
